
Introduction
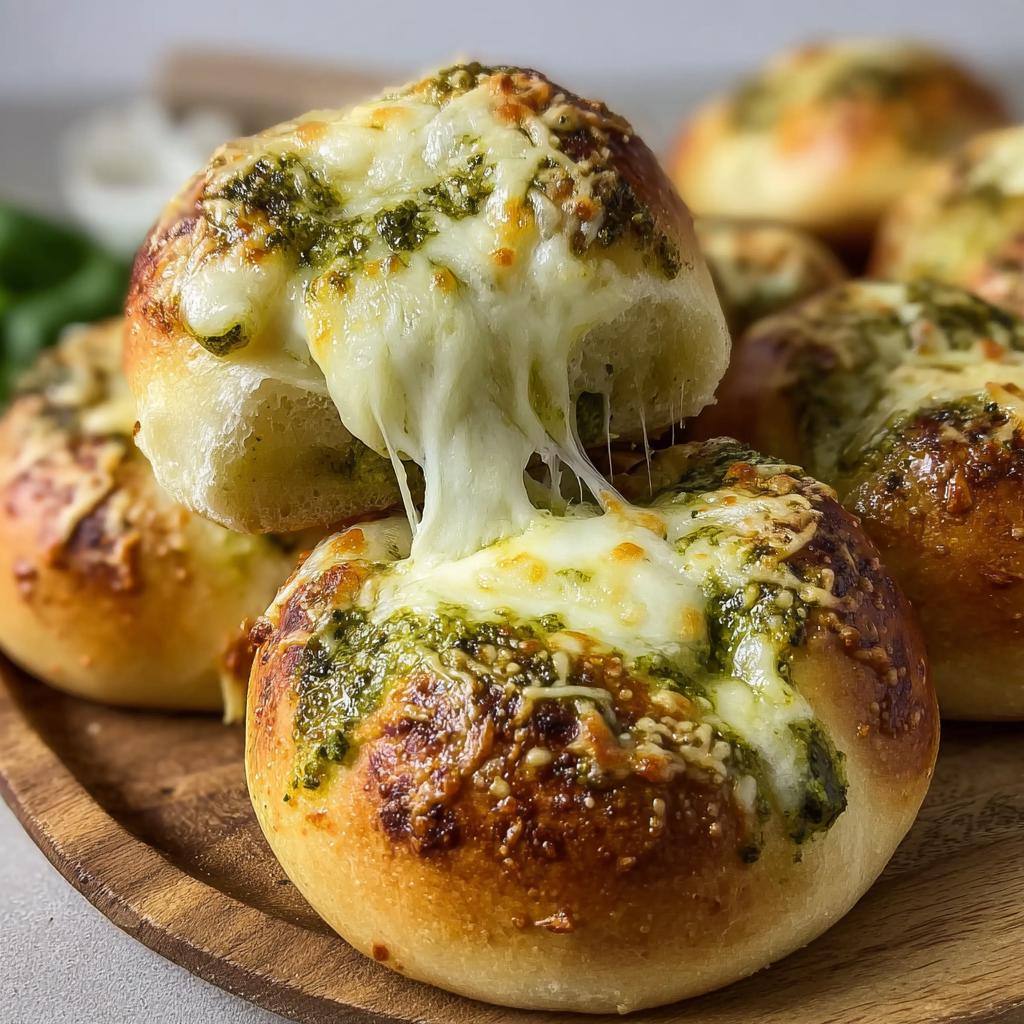
If you're looking for a delightful snack that combines comfort and gourmet flair, Easy Cheesy Pesto Bombs are the answer. These bite-sized wonders encapsulate melty cheese surrounded by a savory, herb-filled pesto, all nestled in a golden, crispy pastry shell. Perfect for family gatherings or a cozy night in, they bring a burst of flavor with every bite.
Creating these treats might seem intimidating, but they require just a handful of ingredients and simple techniques. Whether you're hosting a gathering or simply craving a snack, these pesto bombs come together easily and are sure to impress. The harmony of rich cheese and fragrant basil pesto creates an irresistible combination that will leave your guests asking for more.
Ingredients
- 1 cup store-bought pesto
Pesto provides a robust flavor base with its blend of basil, garlic, pine nuts, and Parmesan cheese. It infuses the bombs with a fresh, herby taste, making them aromatic and full of depth. - 2 cups shredded mozzarella cheese
Mozzarella is the ideal cheese choice due to its excellent melting quality. It brings a creamy texture to the bombs that contrasts beautifully with the crunchy exterior. - 1 package of puff pastry (2 sheets)
Puff pastry serves as the outer shell, creating a light and flaky texture. Its ability to puff up while baking results in a delightful crunch that encases the cheesy filling. - 1 egg (for egg wash)
The egg wash helps achieve a beautiful golden-brown finish on the pastry. It enhances the visual appeal and provides an extra layer of moisture to keep the filling deliciously elastic. - Salt and pepper to taste
These basic seasonings elevate the overall flavor profile. Adjusting them according to your preference ensures that the filling is well-seasoned and balanced.
Directions & Preparation
Step 1: Preheat your oven to 400°F (200°C).
Preheating the oven guarantees that the pastry cooks evenly and achieves that desired flaky texture. Keeping the temperature consistent ensures proper baking and prevents sogginess.
Step 2: Thaw the puff pastry sheets on a floured surface for about 30 minutes.
Allowing the puff pastry to thaw evenly prevents it from becoming too sticky or tearing when you handle it. Rolling it out lightly on a floured surface also ensures it maintains its integrity.
Step 3: Roll out the puff pastry sheets slightly thinner and then cut them into squares (about 3×3 inches).
Cutting the pastry into uniform squares allows for evenly sized bombs. Rolling it thinner maximizes the flakiness while ensuring enough room to contain the filling without bursting.
Step 4: In a bowl, mix the shredded mozzarella cheese and pesto until well combined.
This step ensures that the cheese and pesto are evenly distributed, providing consistent flavor in every bite. Mixing them well before filling helps prevent clumping.
Step 5: Place a tablespoon of the cheese-pesto mixture in the center of each pastry square.
Be careful not to overfill; this keeps the filling secure as it bakes. Properly placing the mixture in the middle allows the pastry to fold easily around it for a neat package.
Step 6: Fold the pastry squares into triangles and seal the edges with a fork or pinch them closed.
Sealing the edges properly is crucial to prevent leakage during baking. It locks in the cheesy goodness and ensures a lovely presentation once they come out of the oven.
Step 7: Brush the tops with beaten egg for a golden finish.
The egg wash not only provides an attractive sheen but also helps the pastry puff while baking. It plays a pivotal role in the visual and textural success of your bombs.
Step 8: Bake for 15-20 minutes or until golden brown and puffed.
Baking time may vary depending on your oven, so keep a close eye on the pastries. The goal is a deep golden hue, indicating they are perfectly cooked and ready to emerge from the oven.
Step 9: Allow to cool for a few minutes before serving warm.
Letting them cool slightly enhances flavor release while making them easier to handle. This waiting time will prevent the cheese from being too hot and allows the flavors to meld.
Innovative Flavor Variations to Explore
While the classic mozzarella and pesto combination is delightful, consider experimenting with different fillings. Sun-dried tomatoes, goat cheese, or roasted vegetables can be a fabulous addition, completely transforming the flavor profile. You might even try adding a dash of red pepper flakes for a spicy kick, catering to various taste preferences while keeping the recipe fun and exciting.
Serving Suggestions to Elevate Your Spread
Pair these Easy Cheesy Pesto Bombs with a zesty dipping sauce for enhanced enjoyment. A balsamic glaze or a simple marinara sauce works beautifully to complement the cheesy richness. For a more elevated presentation, consider serving them alongside a fresh arugula salad drizzled with lemon vinaigrette, providing a refreshing contrast to the savory pastries.
Tips for Perfect Puff Pastry Handling
Puff pastry can be temperamental, but with a few tips, it becomes manageable. Always work on a chilled surface to maintain its structure, and avoid over-handling to keep the layers intact. If your kitchen is warm, consider chilling the formed bombs for about 15 minutes before baking, ensuring they puff up beautifully while preventing any sogginess.
FAQs
What if my cheese filling is too thick?
If the filling becomes too thick to easily scoop, consider adding a teaspoon of olive oil or a splash of cream to loosen it. This will help maintain the right consistency while keeping the flavor intact.
How can I make the edges more decorative?
You can create a crimped edge by using a fork to press down on the edges before baking. This not only secures them but adds a lovely aesthetic touch.
What should I do if my pesto bombs are undercooked?
If your bombs are undercooked, simply return them to the oven for an additional 3-5 minutes, keeping a close watch as they finish baking. They should be golden and crispy when done.
Can I use homemade pesto instead of store-bought?
Absolutely! Homemade pesto can enhance flavor since you control the ingredients. Just ensure it has a balanced blend of herbs, nuts, and oil for the best result.
What if my pastry is tearing when I fold it?
If your pastry tears, it might be too warm or thin. Chilling it in the refrigerator for a few minutes can help firm it up for easier handling.
Can I make these bomb with different cheese types?
Certainly! Mixing cheeses like cheddar, gouda, or feta can create unique flavors. Just balance strong flavors with milder ones to maintain cohesion.
Conclusion
Easy Cheesy Pesto Bombs offer a simple yet rewarding cooking experience that convenes flavors perfectly. With a few ingredients and straightforward techniques, you can create an irresistible snack that is as pleasing to the eye as it is to the palate.
Experimenting with different fillings and serving suggestions can take this recipe from delicious to extraordinary, ensuring it fits seamlessly into any occasion. Your culinary prowess is bound to shine through, and your guests will undoubtedly appreciate these scrumptious bites.
Recipe Card

Savory Cheesy Pesto Bombs for Effortless Entertaining
Ingredients
Method
- Preheat your oven to 400°F (200°C).
- Thaw the puff pastry sheets on a floured surface for about 30 minutes.
- Roll out the puff pastry sheets slightly thinner and then cut them into squares (about 3x3 inches).
- In a bowl, mix the shredded mozzarella cheese and pesto until well combined.
- Place a tablespoon of the cheese-pesto mixture in the center of each pastry square.
- Fold the pastry squares into triangles and seal the edges with a fork or pinch them closed.
- Brush the tops with beaten egg for a golden finish.
- Bake for 15-20 minutes or until golden brown and puffed.
- Allow to cool for a few minutes before serving warm.
Tried this recipe?
Let us know how it was!Notes
Additional serving suggestions: pair with a crisp salad, garlic bread, or roasted seasonal vegetables for balance.
For make-ahead, prep components separately and assemble just before heating to preserve texture.
Taste and adjust with acid (lemon/vinegar) and salt right at the end to wake up flavors.