Introduction
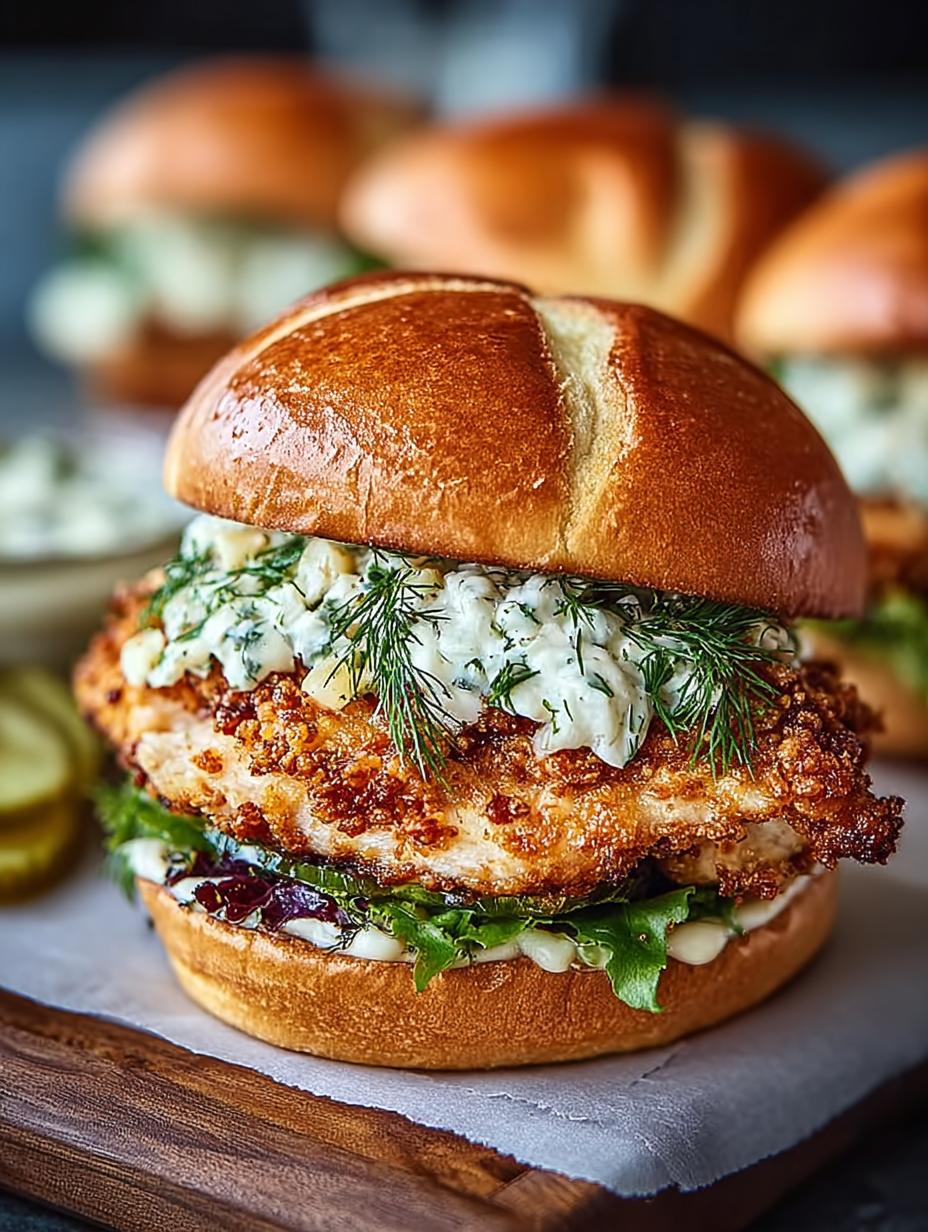
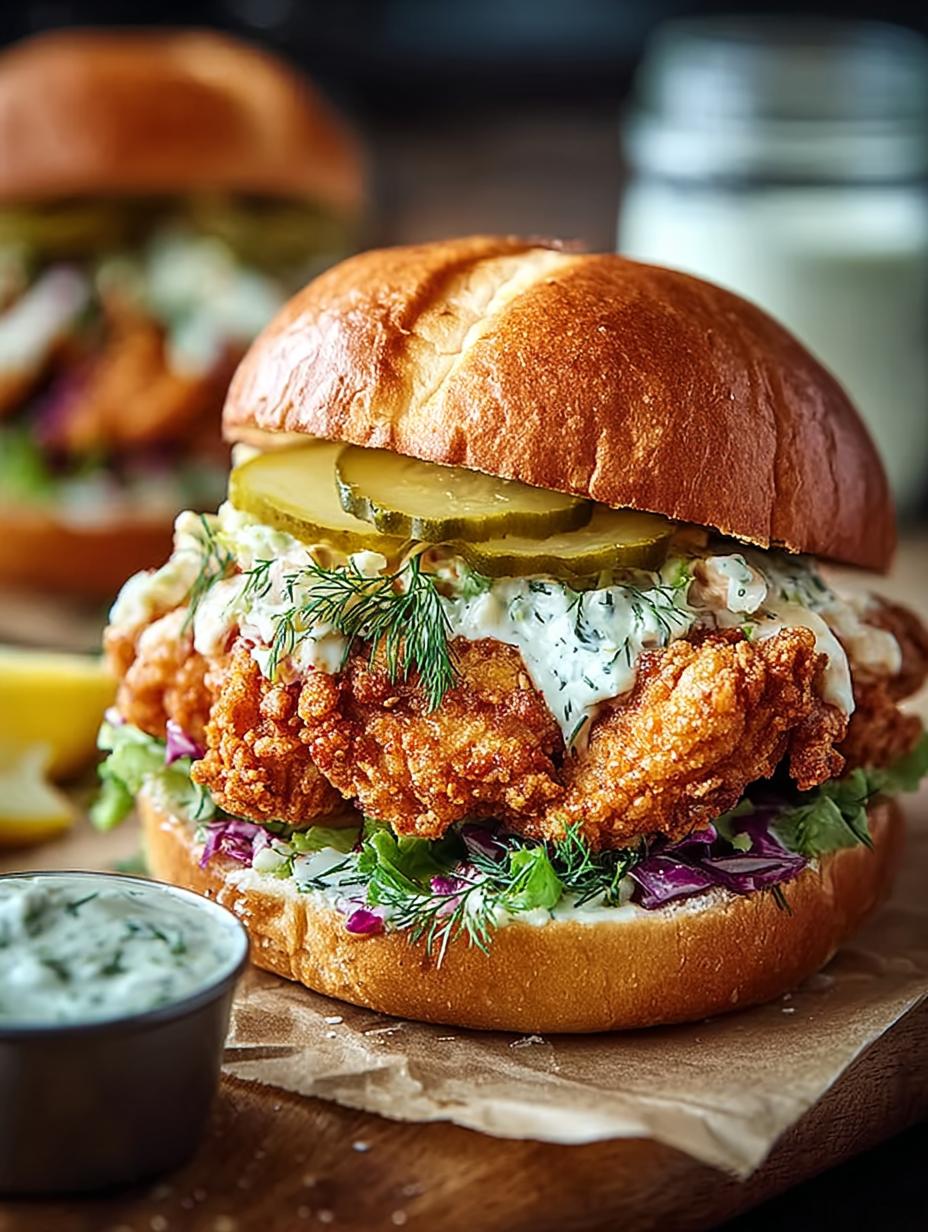
A crispy dill chicken sandwich is the perfect treat for a casual lunch or dinner. The crunchy fried chicken pairs beautifully with the tangy dill sauce, creating a delightful flavor balance. Not only is it easy to prepare, but it also provides a satisfying crunch that will please any palate.
Using fresh dill in the mayonnaise gives the sandwich a fresh burst of flavor while enhancing the overall experience. This sandwich is a wonderful way to elevate your chicken-sandwich game and impress your family or guests. Get ready to sink your teeth into a hearty, flavorful treat!
Ingredients
- 2 large boneless, skinless chicken breasts
The chicken is the star of this sandwich, providing a hearty protein base. Choosing boneless and skinless cuts allows for easier preparation and a leaner result. - 1 cup all-purpose flour
Flour acts as the initial coating for the chicken, creating a barrier that helps the moisture lock in during frying while giving the fry a grip for the egg and breadcrumb layers. - 2 large eggs
The eggs are crucial for binding the flour and breadcrumbs to the chicken. This step ensures a thicker, crispier coating as the egg cooks and adheres to the chicken. - 1 cup panko breadcrumbs
Panko breadcrumbs offer a lighter, airier texture compared to regular breadcrumbs, resulting in a crunchier and more satisfying exterior once fried. - 1/2 cup mayonnaise
Mayonnaise serves as the base for the creamy dill sauce, providing moisture and richness to balance the crunchy chicken. - 2 tablespoons chopped fresh dill
Fresh dill adds a fragrant herbal note to the mayonnaise, enhancing the flavor profile of the sandwich and giving it a refreshing kick. - 4 brioche buns
Brioche buns are soft and slightly sweet, making them an excellent choice for embracing the flavors of the crispy chicken and dill sauce, providing both texture and taste. - Vegetable oil for frying
Choosing a neutral vegetable oil for frying helps to achieve the perfect golden brown color for the chicken without interfering with its flavor.
Directions & Preparation
Step 1: Slice chicken breasts in half horizontally and pound to an even thickness.
This step ensures that the chicken cooks evenly and remains juicy in the center. By pounding the chicken, you also tenderize the meat, allowing the flavors to permeate better during cooking.
Step 2: Set up three separate coating stations: one with flour, one with beaten eggs, and one with panko breadcrumbs.
Having three stations ready helps create an efficient coating process, allowing you to quickly and systematically prepare the chicken. This organization saves time and ensures an even coating across the chicken pieces.
Step 3: Coat each chicken piece in flour, then dip in the beaten eggs, and finally cover in panko breadcrumbs.
This three-step dredging process builds a thick, crunchy layer on the chicken. Flour allows the egg to stick, which in turn helps the panko adhere, creating a perfect crispy outer layer once fried.
Step 4: Heat vegetable oil in a large skillet over medium-high heat.
Proper oil temperature is crucial for achieving that sought-after crispy texture. A good cue is if the oil shimmers—this indicates it’s hot enough to fry without overcooking the chicken or making it greasy.
Step 5: Fry the chicken for 4-5 minutes on each side until golden brown.
Frying for the right amount of time ensures the chicken is cooked through while achieving a perfect golden color on the outside. It's essential to resist the urge to overcrowd the pan as this can lower the oil temperature, leading to less crispy chicken.
Step 6: Mix mayonnaise with dill and lemon juice for the sauce.
This step pulls together the elements of flavor that make this sandwich special. The acidity of the lemon juice balances the richness of the mayo and enhances the freshness of the dill.
Step 7: Toast brioche buns until golden brown.
Toasting buns contributes to a delightful crunch and helps prevent them from becoming soggy when you add the moist chicken and sauce. This step also elevates the texture of your sandwich.
Step 8: Assemble sandwiches with dill mayo, lettuce, fried chicken, and pickles.
Layering the ingredients in this order ensures that the flavors come together in each bite. The crispy chicken, creamy sauce, and crunchy pickles complement each other beautifully, creating a sandwich that's both satisfying and delicious.
The Magic of Fresh Dill
Utilizing fresh dill in this sandwich not only enhances the flavor of the creamy mayo but also adds a lovely aromatic layer that brings brightness to each bite. Fresh dill has a distinct flavor profile that pairs wonderfully with the crispy chicken, cutting through the richness and providing a refreshing herbal note.
Choosing the Right Buns
The choice of bun can elevate your crispy dill chicken sandwich significantly. Brioche buns contribute a subtly sweet flavor and a soft texture that perfectly complements the crispy chicken and chunky dill sauce. Their sturdy structure also holds up well against the fillings, preventing sogginess and allowing for a fulfilling bite.
Frying Tips for Perfect Chicken
To achieve perfectly fried chicken, maintain an optimal oil temperature. A temperature of around 350°F is ideal—too low and the chicken absorbs excess oil; too high, and it risks burning before cooking through. Utilizing a thermometer can help keep track, ensuring each piece turns out crispy and golden without being overcooked.
FAQs
What if my chicken coating is too thick?
If the coating seems too thick, ensure that each piece of chicken is properly coated at each stage. You can lightly press the chicken into the panko breadcrumbs to ensure even coating without adding too much bulk.
Can I scale this recipe for a larger group?
Certainly! Simply double or triple the ingredient amounts as needed. Just ensure you have enough space in your frying pan or use multiple pans to fry the chicken pieces without overcrowding.
How do I avoid overcooking the chicken?
To prevent overcooking, monitor the frying time closely and use a meat thermometer to check for an internal temperature of 165°F. Adjust your heat as necessary to maintain an even cook without burning the exterior.
What can I do if my sauce is too bland?
If your sauce is lacking flavor, try adding a pinch of salt or a little extra lemon juice for brightness. You can also incorporate more fresh dill or even a dash of hot sauce for added complexity.
Can I use dried dill instead of fresh?
While fresh dill is recommended for its flavor, you can substitute dried dill. Use about one-third of the amount since dried herbs are more concentrated – this will still add a lovely herby note to your sauce.
Can I add more spices to the flour coating?
Absolutely! Feel free to sprinkle in spices like paprika, garlic powder, or onion powder into the flour for additional flavor. Adjust to your taste, as these can enhance the overall profile of the chicken.
Conclusion
Creating a crispy dill chicken sandwich at home is an enjoyable cooking experience that yields delicious results. From the crunchy coating to the zesty dill sauce, each component plays an integral role in crafting a delightful meal.
With this recipe, you can customize flavors and textures to your preference, making it a versatile option for gatherings or family dinners. Enjoy the simple pleasure of a homemade sandwich that doesn't compromise on taste.
Recipe Card

Deliciously Crispy Dill Chicken Sandwich Recipe
Ingredients
Method
- Slice chicken breasts in half horizontally and pound to an even thickness.
- Set up three separate coating stations: one with flour, one with beaten eggs, and one with panko breadcrumbs.
- Coat each chicken piece in flour, then dip in the beaten eggs, and finally cover in panko breadcrumbs.
- Heat vegetable oil in a large skillet over medium-high heat.
- Fry the chicken for 4-5 minutes on each side until golden brown.
- Mix mayonnaise with dill and lemon juice for the sauce.
- Toast brioche buns until golden brown.
- Assemble sandwiches with dill mayo, lettuce, fried chicken, and pickles.
Tried this recipe?
Let us know how it was!Notes
Additional serving suggestions: pair with a crisp salad, garlic bread, or roasted seasonal vegetables for balance.
For make-ahead, prep components separately and assemble just before heating to preserve texture.
Taste and adjust with acid (lemon/vinegar) and salt right at the end to wake up flavors.