Introduction
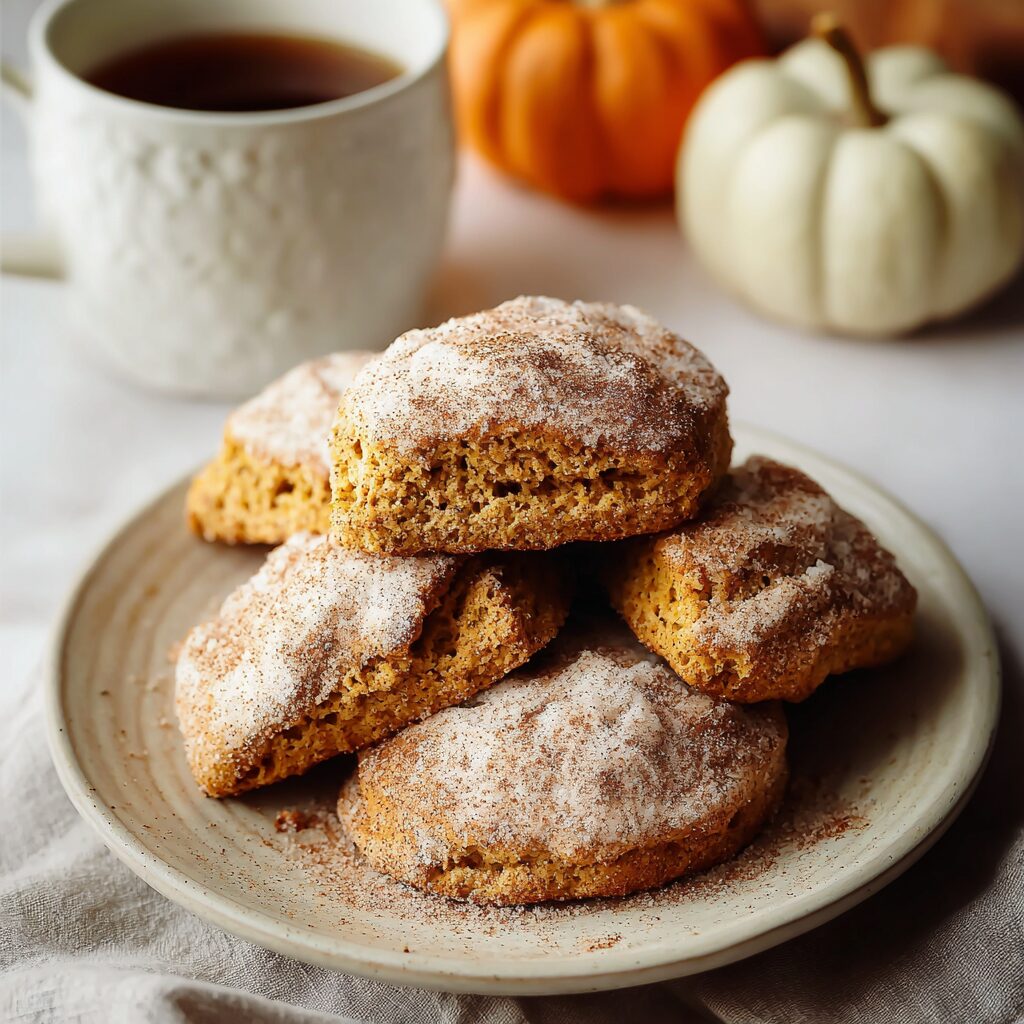
As autumn arrives, the air fills with the rich, warm scents of pumpkin and spice, inviting home cooks to create comforting delights. One of the standout treats for this season is the Pumpkin Snickerdoodle Scone. These tender scones merge the classic flavors of snickerdoodles with the seasonal charm of pumpkin, making them perfect for breakfast or afternoon tea.
With a slightly crispy exterior and a soft, cake-like interior, these scones are not only delightful but also exceedingly simple to whip up. Whether you’re an experienced baker or a novice in the kitchen, you'll find joy in creating these flavorful treats. Let's gather our ingredients and dive into a baking adventure!
Ingredients
- 2 ¾ cups all-purpose flour
This forms the base of the scones, providing structure and stability. The gluten in the flour helps create a tender crumb without being overly dense. - 1 tablespoon baking powder
Baking powder is crucial for leavening; it helps the scones rise and become light and fluffy. Ensuring it's fresh is essential for the best results. - ½ teaspoon salt
Salt enhances the flavors in baked goods, balancing sweetness and bringing out the rich, warm spices in the scone. - ½ teaspoon ground cinnamon
Cinnamon adds warmth and depth to the scone, infusing it with that classic snickerdoodle flavor that pairs beautifully with pumpkin. - 1 teaspoon cream of tartar
This ingredient stabilizes the baking powder and adds a slight tang, which is key in achieving the perfect texture for scones. - ½ teaspoon ground nutmeg
Nutmeg contributes a sweet and nutty flavor that complements both the pumpkin and the cinnamon perfectly, creating a warm spice profile. - ¼ teaspoon ground cloves
Cloves bring an earthy and aromatic element, enhancing the overall flavor complexity of the scones. - ¼ teaspoon ground ginger
Ground ginger adds a hint of warmth and spiciness that brightens the flavor of the pumpkin and mingles wonderfully with the other spices. - ⅓ cup granulated sugar
This sugar provides sweetness and helps achieve a nice golden-brown exterior during baking. - ¼ cup packed light brown sugar
Brown sugar introduces moisture and a subtle caramel flavor, enhancing the scone's richness and depth. - ½ cup unsalted butter, cold and cubed
Cold butter is a key player in creating flaky layers in the scones. It prevents the flour from becoming too oily, resulting in a tender texture. - ⅔ cup canned pumpkin puree
Pumpkin puree adds moisture, flavor, and an irresistible autumnal color while contributing to the scone’s unique texture. - ⅓ cup heavy cream
Heavy cream enriches the dough, helping create a moist and tender scone, while also contributing to a beautiful color during baking. - 1 teaspoon vanilla extract
Vanilla extract deepens the flavor profile, adding a touch of sweetness and rounding out the spices found in the scone. - ¼ cup granulated sugar (for topping)
This sugar will form the delightful cinnamon-sugar topping that adds a layer of sweetness and crunch to the finished scone. - 1 teaspoon ground cinnamon (for topping)
When mixed with sugar, cinnamon creates a fragrant topping that beautifully complements the pumpkin and spiced flavors of the scone.
Directions & Preparation
Step 1: Preheat your oven to 400°F (200°C) and line a baking sheet with parchment paper.
Preheating the oven ensures that the scones bake evenly, achieving a perfect rise and golden color. Lining the baking sheet allows for easy removal and cleanup, preventing the scones from sticking to the surface.
Step 2: In a large mixing bowl, combine the flour, baking powder, salt, cream of tartar, cinnamon, nutmeg, cloves, and ginger.
Mixing the dry ingredients first ensures that the leavening agents and spices are evenly distributed throughout the flour. This step is essential for proper rising and flavor throughout each scone.
Step 3: Add the granulated sugar and light brown sugar to the dry ingredients and stir until combined.
Incorporating the sugars with the dry ingredients helps to evenly sweeten the scone dough. This step balances the flavors of spice and pumpkin, ensuring every bite is delightful.
Step 4: Using a pastry cutter or your fingers, cut the cold butter into the flour mixture until it resembles coarse crumbs.
Cutting in the butter is fundamental for achieving that flaky texture. The bits of cold butter create pockets of steam during baking, which results in a light and airy scone.
Step 5: In another bowl, whisk together the pumpkin puree, heavy cream, egg, and vanilla extract until smooth.
Mixing the wet ingredients separately allows for a smoother incorporation into the dry ingredients. This step ensures that the pumpkin and other flavors meld together seamlessly, promoting an even texture and flavor.
Step 6: Gradually add the wet mixture to the dry ingredients, stirring gently until just combined.
Being cautious not to overmix is crucial; this helps keep the gluten in the flour from developing too much, which can lead to tough scones. The dough should still be slightly sticky but manageable, allowing for a soft texture after baking.
Step 7: Turn the dough out onto a lightly floured surface and pat it into a circle approximately ¾ inch thick.
Patting the dough, rather than rolling it, helps maintain its tenderness. The thickness is important for achieving the right texture and allows for even baking without drying out.
Step 8: Cut the circle into 8 equal wedges and transfer them to the prepared baking sheet, spacing them about 2 inches apart.
Cutting the dough into wedges ensures that they cook evenly and that each scone gets just the right amount of caramelization. Spacing is essential for proper rising and heat circulation.
Step 9: In a small bowl, mix the granulated sugar and ground cinnamon for the topping.
Creating the cinnamon-sugar topping beforehand allows for an even distribution over the scones. This gives each scone a beautiful finish and enhances the flavor profile.
Step 10: Brush the tops of the scones with a little heavy cream, then generously sprinkle with the cinnamon sugar mixture.
Brushing the tops with cream adds sheen and helps the topping stick, while the cinnamon sugar creates a sweet, crunchy exterior that contrasts perfectly with the soft interior.
Step 11: Bake in the preheated oven for 15-18 minutes or until golden brown.
Baking time is crucial; keeping an eye on the scones will help ensure they don’t overbake. Achieving a golden brown color indicates the sugars have caramelized properly, providing both texture and flavor.
Step 12: Remove from the oven and allow the scones to cool on the baking sheet for a few minutes before transferring them to a wire rack.
Letting the scones cool slightly on the baking sheet prevents them from becoming soggy and allows for easier handling. Transferring them to a wire rack lets air circulate, keeping them fresh and fluffy.

Enhancing the Flavor with Spices
The blend of spices in these Pumpkin Snickerdoodle Scones sets them apart from ordinary scones. Each spice plays a unique role in layering flavor—think of cinnamon and nutmeg, complemented by the warmth of ginger and cloves. This mixture not only evokes memories of cozy fall days but also offers a sophisticated taste experience that will keep your taste buds dancing with every bite.
The Art of Cutting in Butter
Achieving the perfect texture in your scones is an art that starts with cutting in the butter. The goal is to leave small chunks of butter intact within the flour, contributing to a flaky consistency. This technique prevents the butter from melting completely into the mixture, allowing steam to form during baking, which ultimately creates light and airy scones. Remember, the colder the butter is, the better the results.
Cinnamon-Sugar: A Sweet Finishing Touch
The final sprinkle of cinnamon-sugar is not just decorative; it’s a transformative finishing touch that elevates these scones. This crunchy topping adds texture, delightful sweetness, and a comforting aroma as they bake. The contrast between the sweet crust and the soft, spiced interior makes for an irresistible treat that’s perfect with a cup of tea or coffee.
FAQs
What if my scone dough seems too dry?
If the dough appears too dry, add a tablespoon of heavy cream at a time until it reaches a workable consistency. The moisture from the pumpkin should help balance it.
Can I substitute fresh pumpkin instead of canned?
Yes, you can use fresh pumpkin puree, but ensure it is well-drained to avoid adding extra moisture that could alter the scone's texture.
Why did my scones turn out too dense?
Density can result from overmixing or using too much flour. Measure accurately and mix just until combined to maintain a light texture.
Can I use different spices in the recipe?
Absolutely! Feel free to experiment with spices like cardamom or allspice for a unique twist, but adjust the amounts to maintain flavor balance.
What should I do if the scones are too sweet?
If they’re overly sweet, reduce the sugar in the dough by a couple of tablespoons next time, or add a pinch of salt to balance sweetness.
Can I add nuts or chocolate chips to the dough?
Certainly! Chopped nuts or chocolate chips can enhance the flavor, just ensure you limit the amount so the scone texture isn't impacted.
Conclusion
Baking Pumpkin Snickerdoodle Scones is a rewarding experience that fills your home with the inviting aromas of autumn spices. These scones offer a delightful combination of flavors and textures, perfect for breakfasts or snacks.
Whether shared with friends or savored with your favorite hot beverage, these scones surely capture the essence of the fall season. Embrace the joy of baking and make these delicious treats a festive tradition in your kitchen!
Recipe Card
Delicious Pumpkin Snickerdoodle Scones to Bake Today
Ingredients
Method
- Preheat your oven to 400°F (200°C) and line a baking sheet with parchment paper.
- In a large mixing bowl, combine the flour, baking powder, salt, cream of tartar, cinnamon, nutmeg, cloves, and ginger.
- Add the granulated sugar and light brown sugar to the dry ingredients and stir until combined.
- Using a pastry cutter or your fingers, cut the cold butter into the flour mixture until it resembles coarse crumbs.
- In another bowl, whisk together the pumpkin puree, heavy cream, egg, and vanilla extract until smooth.
- Gradually add the wet mixture to the dry ingredients, stirring gently until just combined.
- Turn the dough out onto a lightly floured surface and pat it into a circle approximately ¾ inch thick.
- Cut the circle into 8 equal wedges and transfer them to the prepared baking sheet, spacing them about 2 inches apart.
- In a small bowl, mix the granulated sugar and ground cinnamon for the topping.
- Brush the tops of the scones with a little heavy cream, then generously sprinkle with the cinnamon sugar mixture.
- Bake in the preheated oven for 15-18 minutes or until golden brown.
- Remove from the oven and allow the scones to cool on the baking sheet for a few minutes before transferring them to a wire rack.
Tried this recipe?
Let us know how it was!Notes
Additional serving suggestions: pair with a crisp salad, garlic bread, or roasted seasonal vegetables for balance.
For make-ahead, prep components separately and assemble just before heating to preserve texture.
Taste and adjust with acid (lemon/vinegar) and salt right at the end to wake up flavors.