Introduction
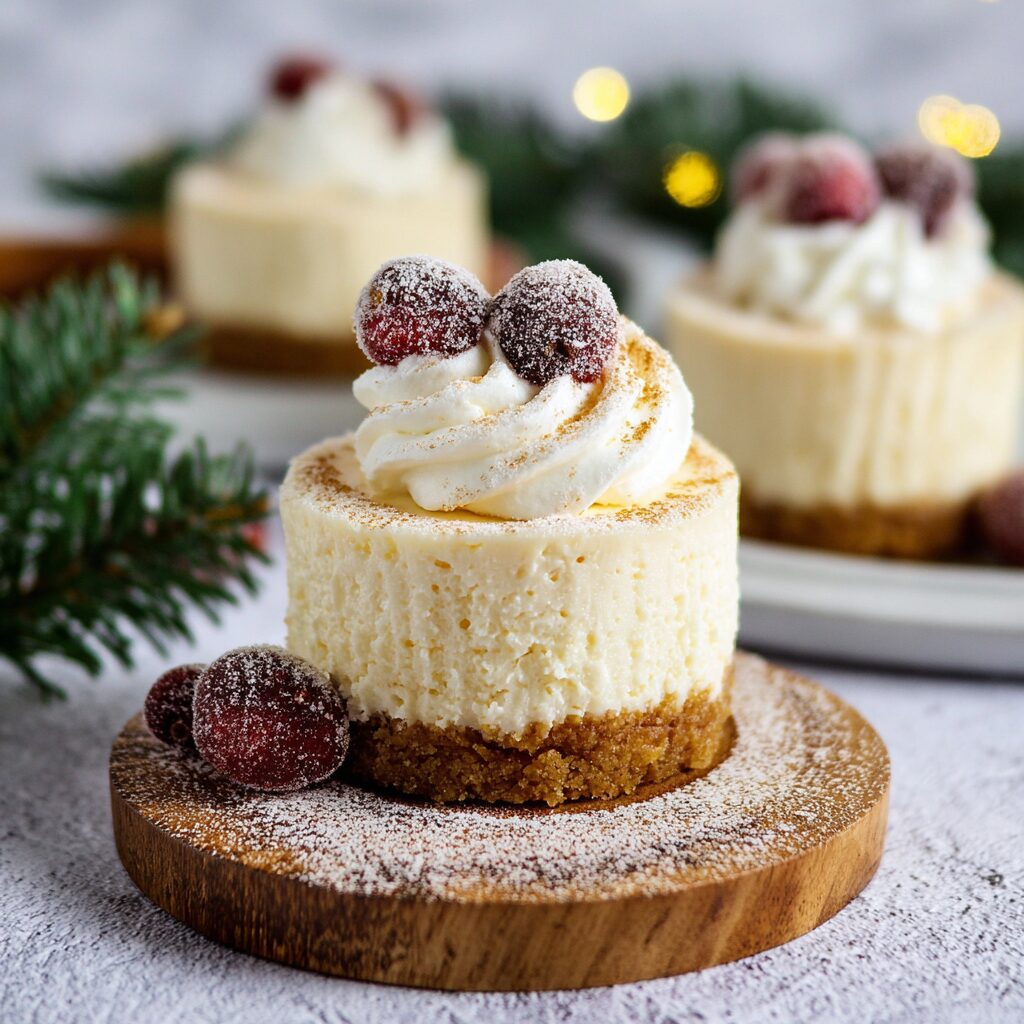
As the holiday season approaches, the inclination to gather around the table with festive treats intensifies. One dessert that captures the spirit of the season beautifully is Mini Eggnog Cheesecake. Creamy, rich, and infused with traditional eggnog flavors, these mini cheesecakes are a delightful alternative to the more common holiday desserts.
The combination of cream cheese and eggnog creates a smooth texture that melts in your mouth, while hints of nutmeg and rum extract transport you to memories of cozy gatherings by the fire. This recipe offers a perfect balance of sweetness and spice, making it an ideal addition to your holiday dessert spread.
Ingredients
- 150 g gingersnap cookies, to make 1 ½ cups
Gingersnap cookies not only provide a crunchy texture for the cheesecake base but also bring a warm, spiced flavor that complements the eggnog perfectly. Their sweetness balances the rich filling and adds a seasonal touch. - 4 tbsp butter, melted
Melted butter acts as a binding agent for the crumbled gingersnap cookies, helping to form a cohesive crust. It infuses the crust with a rich flavor, enhancing the overall taste of the mini cheesecakes. - 1 ½ cups heavy whipping cream
Creamy heavy whipping cream elevates the texture of the cheesecake filling, making it light and fluffy. Whipping it to stiff peaks adds air, creating a delightful mouthfeel that balances the density of the cream cheese. - 2 x 8 oz cream cheese, softened
Softened cream cheese forms the foundation of the cheesecake filling, providing a rich, tangy flavor and a creamy texture. Allowing it to soften at room temperature makes it easier to blend and avoids lumps in the mixture. - 1 cup icing sugar
Icing sugar sweetens the cream cheese filling while dissolving easily into the mixture, ensuring a smooth consistency. It contributes to the overall flavor profile, balancing the richness of the cream cheese. - ½ cup eggnog
Eggnog adds a festive flavor and moisture to the cheesecake filling. Its creamy and spiced characteristics enhance the dessert's seasonal appeal, making every bite reminiscent of holiday cheer. - 1 tsp nutmeg
Nutmeg brings warmth and a hint of spice that is integral to traditional eggnog flavors. It adds depth to the cheesecake and a comforting aroma that invokes nostalgic holiday memories. - 1 tsp rum extract
Rum extract provides an aromatic quality and complements the spiced notes of eggnog. It creates a subtle but significant enhancement to the overall flavor, reminiscent of festive drinks served during the season. - 1 tbsp water
Water is mixed with the gelatin to ensure it dissolves properly and can be incorporated smoothly into the filling. This step is crucial for achieving the desired firm texture of the cheesecake without clumps. - 1 ½ cups sugar, divided
Dividing the sugar allows for one portion to sweeten the cheesecakes while the second portion is used for making the sugared cranberries. This approach balances sweetness across both the cheesecake and its garnish. - ½ cup water
Water is combined with sugar to create a simple syrup for coating the cranberries. This syrup serves to stick sugar to the berries, transforming them into beautiful gems that enhance the presentation of the dessert. - 2 cups fresh cranberries
Fresh cranberries not only add a pop of color and festive flair to the dish but also contribute a tartness that balances the sweetness of the cheesecakes. Sugared cranberries make an elegant and tasty garnish.
Directions & Preparation
Step 1: Line the cups of the mini cheesecake pan with parchment paper.
Cut strips of parchment about 5-6 inches long to wrap inside each cup. This easy step prevents sticking, ensuring a smooth release of the cheesecakes once set. Alternatively, for larger servings, a 9-inch springform pan can be used.
Step 2: Break the gingersnap cookies into a food processor and blend until fine.
This step creates a uniform cookie crumb that forms the cheesecake crust. A food processor makes quick work of this process, yielding fine crumbs that will hold together nicely with the melted butter when pressed into the cup.
Step 3: Transfer the cookie crumbs to a mixing bowl and combine with melted butter.
Mixing the crumbs with melted butter ensures they are evenly coated, which is key to forming a stable crust when pressed into the mini cheesecake cups. The mixture should feel like damp sand when it’s the right consistency.
Step 4: Spoon one tablespoon of the crumb mixture into each cup and press down evenly.
Packing the crumb mixture ensures a firm base for the cheesecake filling. Using something flat, like the bottom of a small glass, helps create an even layer and prevents crumbling when serving.
Step 5: Whip the cream with a mixer until stiff peaks form.
Achieving stiff peaks means your whipped cream will stay light and fluffy while adding volume to the cheesecake mixture. This step significantly contributes to the final texture, ensuring each bite melts in your mouth.
Step 6: In the same mixer bowl, beat the softened cream cheese until creamy and fluffy.
Beating the cream cheese separately ensures a smooth texture, minimizing lumps. Scraping the bowl's sides ensures all the cheese is fully incorporated, leading to a silky cheesecake filling.
Step 7: Add icing sugar and beat until incorporated, then mix to smooth it out.
Incorporating icing sugar slowly prevents a cloud of sugar dust and ensures that it combines cleanly with the cream cheese. This step prepares the filling for the wet ingredients and contributes to its overall sweetness.
Step 8: Pour in the eggnog, nutmeg, and rum extract and mix until smooth.
This step infuses the cheesecake with its signature flavors. Ensuring a smooth mixture at this stage is vital as it allows the flavor elements to meld together without any lumps, creating a harmonious batter.
Step 9: Combine gelatin and water in a small bowl, let it absorb, then microwave to melt.
Allowing the gelatin to absorb water activates it, which is crucial for achieving the right texture in the cheesecake. Microwaving just until melted prevents it from boiling over, preserving its effectiveness as a setting agent.
Step 10: Incorporate the melted gelatin into the cream cheese mixture.
This step ensures that the gelatin is evenly distributed throughout the filling, helping it to set properly. It's important to mix thoroughly to avoid any gelatin clumps that could create an uneven texture.
Step 11: Gently fold one-third of the whipped cream into the mixture, then repeat until fully combined.
Folding rather than mixing preserves the air whipped into the cream, maintaining the light texture of the filling. This delicate technique is critical to achieving that fluffy cheesecake that lingers on the palate.
Step 12: Spoon the filling into the prepared pans and smooth the tops.
Smoothing the filling ensures even presentation and helps it set uniformly. This step is about creating aesthetics as much as functionality, as a polished finish enhances the overall dessert experience.
Step 13: Chill until fully set, at least 6 to 8 hours or preferably overnight.
Allowing the cheesecakes to chill is key for setting the filling, achieving the right firmness, and enhancing the flavors. Patience in this step yields a beautifully textured dessert that’s easy to slice and serve.
Step 14: Prepare the sugared cranberries by mixing sugar and water in a small saucepan.
This creates a syrup that will coat the cranberries, enhancing their sweetness while creating an appealing look. The sugar syrup also serves as a base for sticking the final sugar coating to the berries.
Step 15: Add cranberries to the syrup, stirring to coat, and then lift them out to dry.
Coating the cranberries ensures they are sweetened and beautifully shiny. Drying on a rack helps air circulate around the berries, setting the sugar coating without them becoming too sticky.
Step 16: After an hour's drying, toss cranberries in remaining sugar to coat.
This step creates a beautiful sugar crust around the berries, enhancing their appearance and adding a crunchy texture. The residual tackiness from the syrup ensures the sugar adheres well.
Step 17: Run a knife around the edge of each cheesecake to release it from the pan.
This final step makes it easy to remove the cheesecakes from the molds without damaging them. Running a knife around the edges creates a cleaner release, allowing for a perfect presentation as you serve.
Step 18: Top with sugared cranberries and enjoy.
Garnishing the cheesecakes with the cranberries not only adds visual appeal but offers a burst of tartness that complements the sweet filling. This decadent touch makes each bite even more enjoyable.

Creating the Perfect Crust
The crust is more than just a base; it provides texture and a flavor contrast that enhances the cheesecake experience. Combine gingersnap cookie crumbs with melted butter, pressing firmly in the bottom of each cup. The balance of buttery richness with spiced sweetness is integral to this festive dessert, making it essential to achieve a well-formed crust that holds its shape.
Whipping Cream to Stiff Peaks
Whipping cream is a pivotal element in achieving the right texture for your cheesecake. By beating it until stiff peaks form, you're introducing air that lightens the filling. This contrast between a dense cheesecake and airy whipped cream is what makes this dessert such a delight. Take your time and ensure your bowl and beaters are cold for the best results.
The Art of Sugaring Cranberries
Sugared cranberries are not just an eye-catching topping; they add a festive touch and a burst of tartness to each bite. The process involves coating the berries with a simple syrup and then tossing them in sugar. This creates a beautiful, glistening finish that sets the stage for a striking presentation. Their contrasting flavors to the creamy cheesecakes elevate the overall experience, making your dessert truly memorable.
FAQs
What should I do if the cheesecake filling is too thick?
If your filling seems too thick, try folding in a bit more whipped cream or a splash of eggnog to loosen it. Mix gently to maintain the aeration from the whipped cream.
Can I use a different cookie for the crust?
Absolutely! While gingersnap cookies are traditional for this recipe, you can substitute them with graham crackers or even chocolate cookies for a different flavor profile.
How can I ensure my mini cheesecakes don’t stick to the pan?
Using parchment paper lining is the best way to prevent sticking. Additionally, lightly greasing the parchment or the pan prior to adding the crust can further ensure a smooth release.
What if I want to make these mini cheesecakes gluten-free?
For a gluten-free version, use gluten-free gingersnap cookies or any gluten-free cookie crumbs for the crust. The rest of the ingredients in the cheesecake are naturally gluten-free.
Can I make these mini cheesecakes in advance?
Yes! Mini eggnog cheesecakes can be made a day or two in advance. Just ensure they are well-covered in the refrigerator to maintain freshness and flavor.
What should I do if my filling is too sweet?
If your filling is too sweet for your taste, consider adding a touch more cream cheese or a small pinch of salt. This can help balance the sweetness and enhance the overall flavor.
Conclusion
Mini Eggnog Cheesecakes are a delightful way to celebrate the holiday season with family and friends. Their charming size and rich flavors embody the spirit of festive gatherings, making them an inviting addition to any dessert table.
As you prepare these cheesecakes, remember to savor the process and enjoy the delicious results. With each bite, you’ll be reminded of the joy that comes from sharing tasty treats during this special time of year.
Recipe Card
Celebrate the Season with Mini Eggnog Cheesecakes
Ingredients
Method
- Line the cups of the mini cheesecake pan with parchment paper.
- Break the gingersnap cookies into a food processor and blend until fine.
- Transfer the cookie crumbs to a mixing bowl and combine with melted butter.
- Spoon one tablespoon of the crumb mixture into each cup and press down evenly.
- Whip the cream with a mixer until stiff peaks form.
- In the same mixer bowl, beat the softened cream cheese until creamy and fluffy.
- Add icing sugar and beat until incorporated, then mix to smooth it out.
- Pour in the eggnog, nutmeg, and rum extract and mix until smooth.
- Combine gelatin and water in a small bowl, let it absorb, then microwave to melt.
- Incorporate the melted gelatin into the cream cheese mixture.
- Gently fold one-third of the whipped cream into the mixture, then repeat until fully combined.
- Spoon the filling into the prepared pans and smooth the tops.
- Chill until fully set, at least 6 to 8 hours or preferably overnight.
- Prepare the sugared cranberries by mixing sugar and water in a small saucepan.
- Add cranberries to the syrup, stirring to coat, and then lift them out to dry.
- After an hour's drying, toss cranberries in remaining sugar to coat.
- Run a knife around the edge of each cheesecake to release it from the pan.
- Top with sugared cranberries and enjoy.