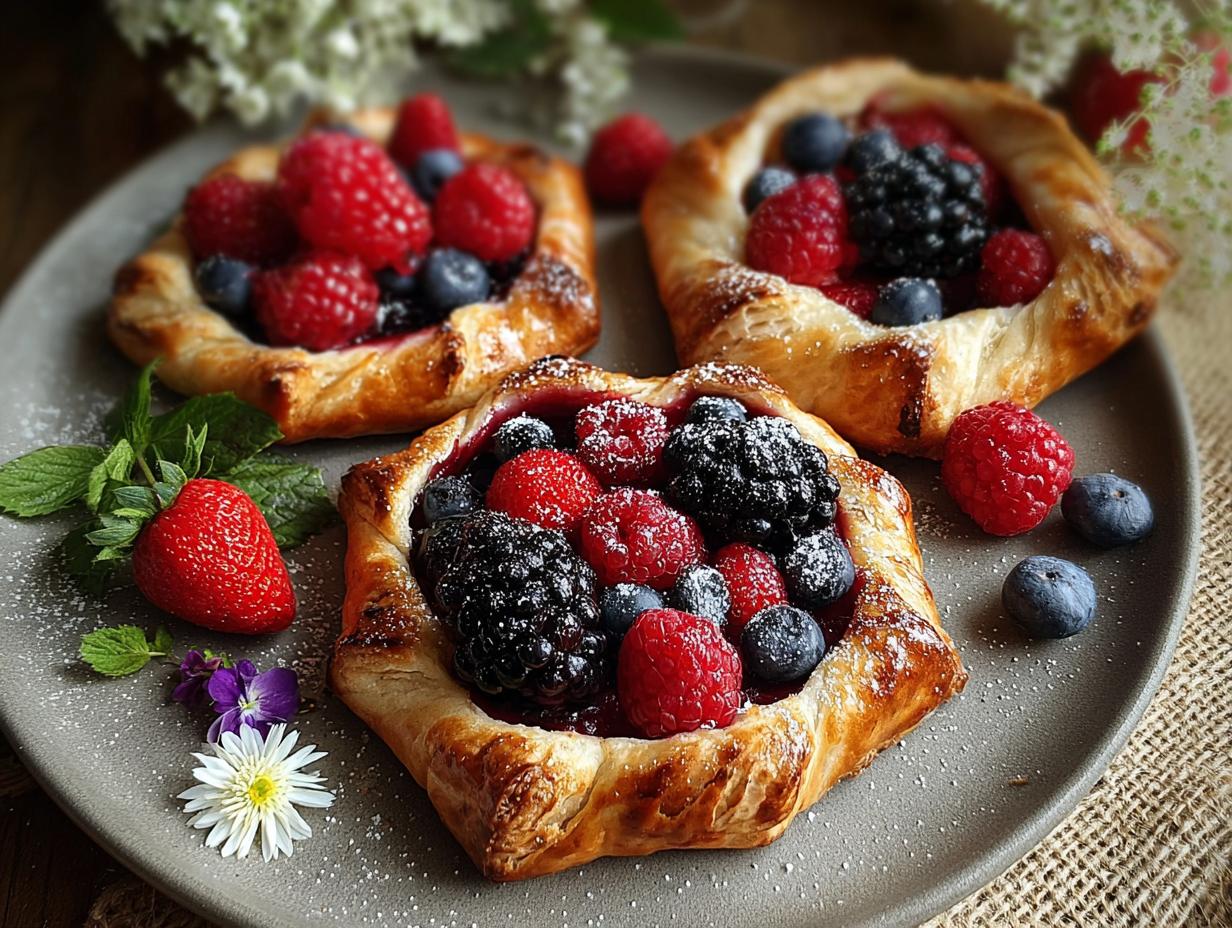
Summer Berry Mini Galettes have become my absolute favorite way to capture the essence of sunny days in dessert form. There’s just something magical about the combination of flaky, buttery crust and the sweet-tart burst of fresh berries. I remember the first time I made this mini berry galette recipe; the aroma filling my kitchen was incredible – a mix of warm pastry and bright fruit that instantly made me feel like summer had truly arrived. These little rustic beauties are so forgiving, and the way the berries bubble up and caramelize is pure joy. Let’s get baking!
Why You’ll Love This Summer Berry Mini Galette Recipe
These little desserts are a dream for so many reasons:
- Effortless Elegance: They look fancy, but they’re surprisingly simple to make.
- Perfect Portions: As individual berry galettes, they’re ideal for parties or a personal treat.
- Seasonal Flavor: You get to taste the best of summer’s bounty.
- Customizable: Easily swap berries or add a pinch of spice.
- The Crust: That flaky, buttery summer berry galette crust is simply divine.
- Versatile: Serve them warm or at room temperature.
- Quick to Assemble: They truly are easy summer berry galettes for any occasion.
- Impressive Presentation: They’re charming, rustic, and always a crowd-pleaser.
Ingredients for Easy Summer Berry Galettes
Gathering your ingredients is the first step to creating these delightful summer berry tarts. You’ll need components for both the dough and the filling. For the flaky summer berry galette crust, I always start with:
- 1 cup All-Purpose Flour – this forms the base of our tender crust
- 1/2 cup Cold Butter – crucial for that signature flaky texture; make sure it’s cubed and very cold
- 1 tablespoon Sugar – just a touch to sweeten the crust
- 1/4 teaspoon Salt – balances the sweetness and enhances flavor
- 3-5 tablespoons Ice Water – the binder that brings the dough together
For the vibrant filling, you’ll want:
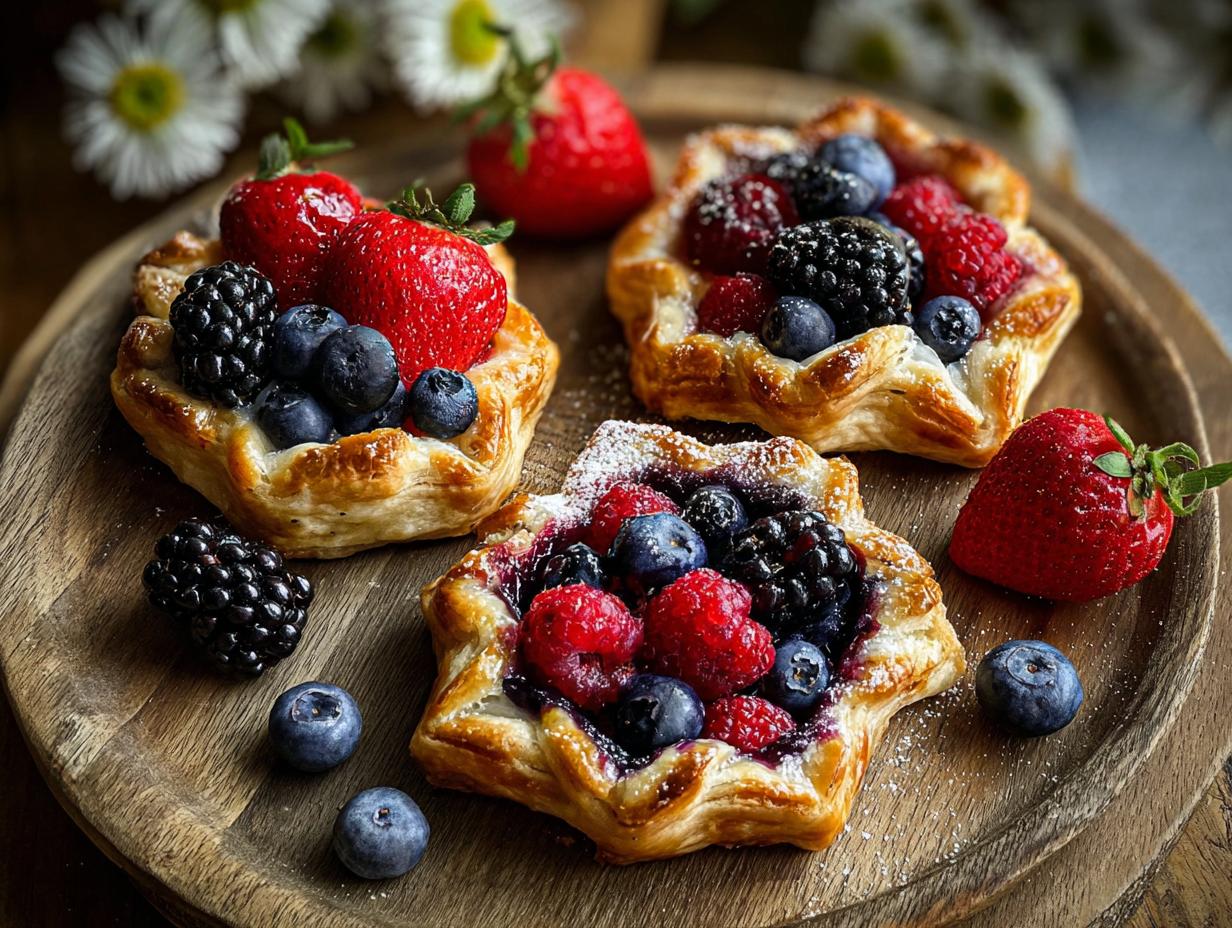
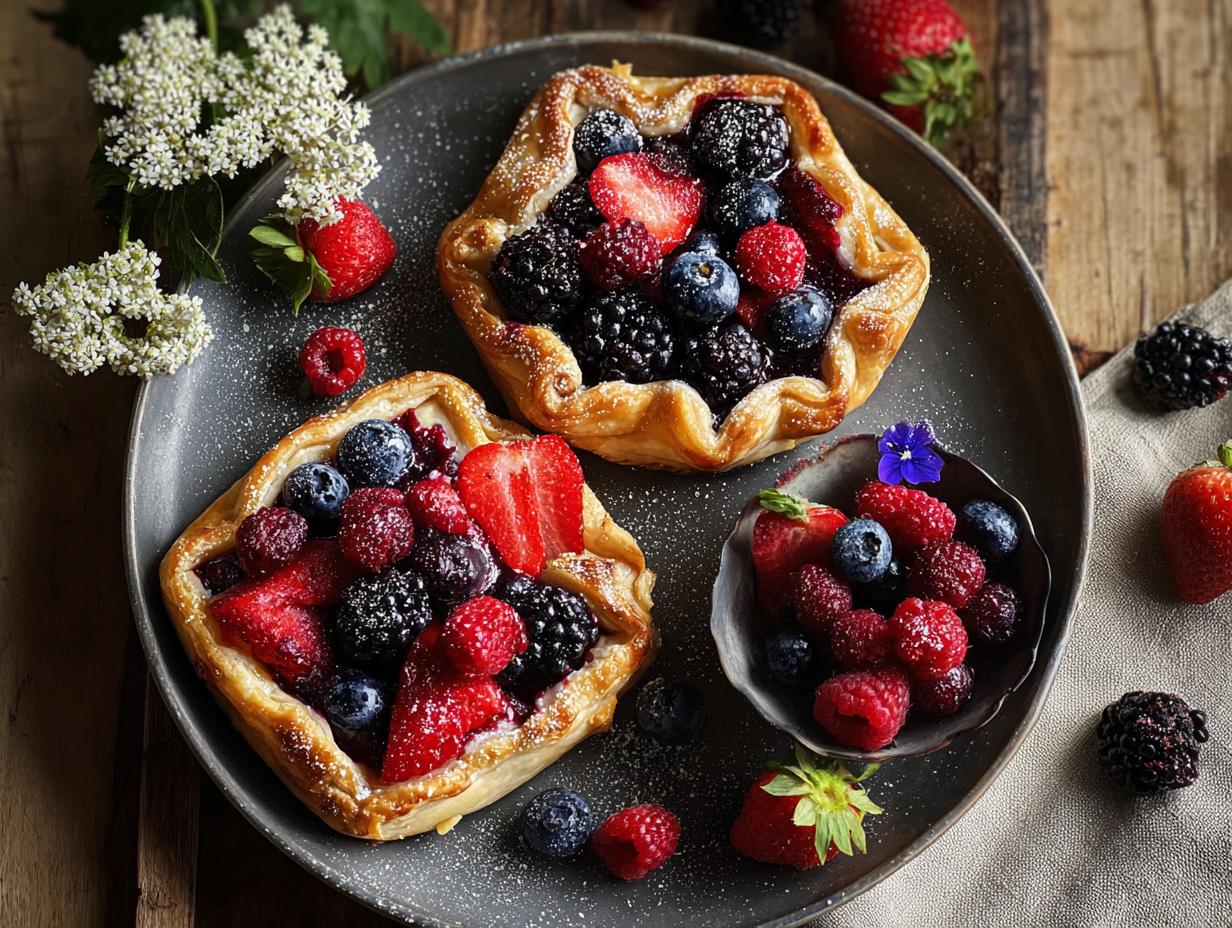
- 1 cup Strawberries – fresh and ripe are best, hulled and sliced
- 2 tablespoons Sugar – to bring out the natural sweetness of the berries
- 2 tablespoons Flour – this helps thicken the berry juices as they bake
- 1 tablespoon Lemon Juice – adds a touch of brightness and acidity
- 1 teaspoon Lemon Zest – for an extra pop of citrus flavor
- 1 tablespoon Butter – dotted over the filling before baking for richness
- 1 tablespoon Coarse Sugar – for a delightful crunchy topping!
- 1 Egg (for egg wash) – to give the crust a beautiful golden sheen
How to Make Mini Berry Galettes
Making these charming small fruit galettes summer is a rewarding process that fills your kitchen with wonderful aromas. Follow these simple steps, and you’ll be enjoying these delightful treats in no time.
- Step 1: Prepare the Dough
In a large bowl, whisk together 1 cup All-Purpose Flour, 1 tablespoon Sugar, and 1/4 teaspoon Salt. Cut in 1/2 cup Cold Butter using a pastry blender or your fingertips until the mixture resembles coarse crumbs with some pea-sized pieces of butter remaining. Gradually add 3-5 tablespoons Ice Water, one tablespoon at a time, mixing gently until a dough just comes together. Don’t overmix! Form the dough into a disc, wrap it tightly in plastic wrap, and refrigerate for at least 1 hour. This chilling time is essential for a flaky crust. - Step 2: Mix the Berry Filling
While the dough is chilling, prepare the luscious berry filling. In a separate bowl, gently toss together 1 cup Strawberries (hulled and sliced), 2 tablespoons Sugar, 2 tablespoons Flour, 1 tablespoon Lemon Juice, and 1 teaspoon Lemon Zest. Let this mixture sit for about 10 minutes. You’ll see the berries start to release their juices, creating a beautiful syrupy base. - Step 3: Assemble Your Galettes
Preheat your oven to 350°F (177°C). Line a baking sheet with parchment paper. On a lightly floured surface, roll out the chilled dough to about ⅛-inch thickness. Use a round cutter (about 5-6 inches in diameter) to cut out 6 circles. Carefully transfer these dough circles to the prepared baking sheet. Spoon a portion of the berry mixture into the center of each dough circle, leaving about a 1-inch border. - Step 4: Fold and Bake
Gently fold the edges of the dough up and over the berry filling, pleating as you go to create a rustic, open-faced tart. Dot the top of the berry filling with 1 tablespoon Butter, cut into small pieces. In a small bowl, whisk 1 Egg to create an egg wash and lightly brush it over the folded crust edges. Sprinkle the crust with 1 tablespoon Coarse Sugar for a delightful crunch and visual appeal. Slide the baking sheet into the preheated oven for 30 minutes, or until the crust is a deep golden brown and the berry filling is bubbly and looks luscious. The smell of these baking mini berry galettes is absolutely divine! - Step 5: Cool and Enjoy
Once baked, carefully remove the galettes from the oven. Let them cool on the baking sheet for about 10-15 minutes before transferring them to a wire rack. This brief cooling period allows the filling to set properly. These homemade summer berry galettes are best served warm, perhaps with a scoop of vanilla ice cream or a dollop of whipped cream.
Pro Tips for the Best Summer Berry Mini Galettes
I’ve learned a few tricks over the years that make these summer berry tarts truly shine. Follow these tips for guaranteed success:
- Keep your butter and water ice cold when making the dough; this is key for a flaky crust.
- Don’t overwork the dough! Mix it just until it comes together to avoid a tough texture.
- Let the berry filling sit for 10 minutes before assembling; this helps thicken the juices.
- A sprinkle of coarse sugar on the crust before baking adds a lovely crunch and sparkle.
- Ensure your oven is fully preheated for that perfect golden-brown finish.
What’s the secret to perfect Summer Berry Mini Galettes?
The real secret to the best summer berry galette recipe lies in the balance of cold ingredients for the crust and not overworking the dough. This ensures that signature flaky, buttery texture that makes these mini tarts so irresistible. For more baking tips, check out the beauty of food.
Can I make Summer Berry Mini Galettes ahead of time?
Yes! You can prepare the dough and the berry filling up to a day in advance. Keep the dough chilled and the filling covered in the refrigerator. Assemble and bake them just before you plan to serve for the freshest taste.
How do I avoid common mistakes with Summer Berry Mini Galettes?
A common pitfall is a soggy bottom crust. Make sure your berries aren’t too juicy and that you’ve used flour to thicken the filling. Also, avoid overfilling the galettes to prevent spillage during baking. Learning about desserts can help prevent common baking issues.
Best Ways to Serve Summer Berry Mini Galettes
These delightful small fruit galettes summer are incredibly versatile and can be enjoyed in so many ways! They’re perfect as stand-alone treats, but I love elevating them with a few simple additions. One of my favorite summer berry dessert ideas is to serve them warm with a generous scoop of creamy vanilla bean ice cream. The contrast between the warm, flaky pastry and the cold, smooth ice cream is pure bliss. You could also try a dollop of freshly whipped cream or a drizzle of crème anglaise for a touch of elegance. For a lighter touch, a dusting of powdered sugar is always a charming finish. Consider pairing them with a refreshing drink like a Moscow Mule cocktail.
Nutrition Facts for Summer Berry Mini Galettes
Here’s a breakdown of what you can expect in each of these delightful treats. When enjoying these easy summer berry galettes, keeping track of the details can be helpful.
- Calories: 200 kcal
- Fat: 10 g
- Saturated Fat: 6 g
- Protein: 2 g
- Carbohydrates: 30 g
- Fiber: 1 g
- Sugar: 10 g
- Sodium: 150 mg
Nutritional values are estimates and may vary based on specific ingredients used and portion sizes.
How to Store and Reheat Summer Berry Mini Galettes
Once your delicious homemade summer berry galettes have cooled, proper storage is key to preserving their delightful texture. For the best experience, let them cool completely on a wire rack. Once cool, wrap each of these rustic berry mini tarts individually in plastic wrap, then place them in an airtight container. Stored this way in the refrigerator, they’ll stay fresh for about 3 to 4 days. If you want to keep them even longer, you can freeze them for up to 3 months. Wrap them well in plastic wrap, then foil, to prevent freezer burn.
Reheating these gems is simple! For a slightly crisp crust, pop them in a preheated oven at 300°F (150°C) for about 5-10 minutes. If you’re reheating from frozen, add a few extra minutes to the baking time. You can also gently warm them in a toaster oven or even a microwave for a quick treat, though the crust might be a bit softer. For more information on food storage, you can explore sustainable farming practices.
Frequently Asked Questions About Summer Berry Mini Galettes
What are Summer Berry Mini Galettes?
Summer Berry Mini Galettes are delightful, free-form tarts made with a simple pastry crust and filled with fresh, seasonal berries. They’re essentially smaller, individual versions of a traditional galette, making them perfect for personal servings or elegant desserts. They offer a rustic charm and a burst of fresh fruit flavor.
Can I use frozen berries for my Summer Berry Mini Galettes?
Yes, you can! If using frozen berries, don’t thaw them completely. Toss them directly with the sugar, flour, and lemon juice. You might need to add a few extra minutes to the baking time to ensure the filling is bubbly and cooked through. This is a great way to enjoy these treats even when fresh berries aren’t in season, making them a truly quick summer berry galette option.
What’s the best way to get a flaky crust for my Summer Berry Mini Galettes?
The key to a flaky crust is to keep your ingredients, especially the butter and water, as cold as possible. Cut the cold butter into the flour mixture until it resembles coarse crumbs with some pea-sized pieces still visible. Don’t overwork the dough when adding water; just mix until it holds together. This ensures the butter creates steam pockets during baking, resulting in that wonderful flaky texture.
How do I prevent my Summer Berry Mini Galettes from becoming soggy?
To avoid a soggy bottom, make sure you use the flour in the filling to help absorb excess berry juices. Also, ensure your oven is properly preheated to the correct temperature. A good practice is to let the assembled galettes rest for a few minutes before baking, and definitely allow them to cool slightly after baking to let the filling set properly.
Variations of Summer Berry Mini Galettes You Can Try
Once you’ve mastered the basic recipe, don’t be afraid to get creative with these delightful summer fruit pastry tarts! There are so many ways to customize them to your liking.
- Gluten-Free Summer Berry Galettes: For those avoiding gluten, simply swap the all-purpose flour for a good quality gluten-free all-purpose flour blend in the crust. You might need a touch less ice water, so add it gradually. The result is just as delicious!
- Vegan Summer Berry Galettes: To make these treats vegan, substitute the butter in the crust with vegan butter or coconut oil (solidified). For the egg wash, use a plant-based milk like almond or soy milk, and skip the butter dots in the filling.
- Mixed Berry Medley: Don’t limit yourself to just strawberries! A mix of blueberries, raspberries, and blackberries creates a beautiful color and flavor profile. Adjust the sugar slightly depending on the sweetness of your berries.
- Spice It Up: Add a pinch of cinnamon or nutmeg to the berry filling for a warmer, more complex flavor, especially nice if you’re making these towards the end of summer.

Summer Berry Mini Galettes: 1 Flaky Crust Secret
- Prep Time: 15 minutes
- Cook Time: 30 minutes
- Total Time: 1 hour 45 minutes
- Yield: 6 galettes 1x
- Category: Desserts
- Method: Baking
- Cuisine: American
- Diet: Vegetarian
Description
These Summer Berry Mini Galettes are effortless, charming desserts perfect for sunny days. With a flaky, buttery crust and a vibrant medley of seasonal berries, they are easy to assemble and incredibly versatile. Enjoy them warm with ice cream or a dusting of powdered sugar.
Ingredients
- For the Pie Crust:
- 1 cup All-Purpose Flour
- 1/2 cup Cold Butter
- 1 tablespoon Sugar
- 1/4 teaspoon Salt
- 3–5 tablespoons Ice Water
- For the Filling:
- 1 cup Strawberries
- 2 tablespoons Sugar
- 2 tablespoons Flour
- 1 tablespoon Lemon Juice
- 1 teaspoon Lemon Zest
- 1 tablespoon Butter
- 1 tablespoon Coarse Sugar
- 1 Egg (for egg wash)
Instructions
- Make the Pie Crust: In a large bowl, whisk together flour, sugar, and salt. Cut in cold butter until the mixture resembles coarse crumbs. Gradually add ice water, mixing until a dough forms. Wrap in plastic and refrigerate for at least 1 hour.
- Prepare the Filling: In another bowl, gently toss together the sliced strawberries, sugar, flour, lemon juice, and zest until well combined. Let it sit for about 10 minutes to release the juices.
- Assemble Galettes: Preheat your oven to 350°F (177°C). Roll out the chilled dough on a floured surface to about ⅛-inch thick. Cut out 6 circles and transfer them onto a parchment-lined baking sheet. Spoon the berry mixture into the center of each circle, fold the edges over the filling, leaving the center exposed. Dot the fruit with butter, brush the edges with beaten egg, and sprinkle with coarse sugar.
- Bake: Slide the baking sheet into the oven and bake for 30 minutes or until the crust is golden brown and the filling is bubbly. Let them cool slightly before serving.
Notes
- Serve warm with a scoop of vanilla ice cream for an even sweeter treat.
- Store cooled galettes in a clean kitchen towel for up to 2 days.
- For a gluten-free version, use a gluten-free flour blend.
- Experiment with other berries like blueberries and raspberries for a berry medley.
Nutrition
- Serving Size: 1 galette
- Calories: 200 kcal
- Sugar: 10 g
- Sodium: 150 mg
- Fat: 10 g
- Saturated Fat: 6 g
- Unsaturated Fat: 4 g
- Trans Fat: 0 g
- Carbohydrates: 30 g
- Fiber: 1 g
- Protein: 2 g
- Cholesterol: 30 mg
Keywords: Summer Berry Mini Galettes, Summer berry tarts, Mini berry galette recipe, Small fruit galettes summer, Easy summer berry galettes, Individual berry galettes, Homemade summer berry galettes, How to make mini berry galettes, What are summer berry galettes, Best summer berry galette recipe, Quick summer berry galette, Rustic berry mini tarts, Seasonal berry galette recipe, Summer fruit pastry tarts, Simple individual berry galettes, Baking mini berry galettes, Summer berry dessert ideas, Gluten-free summer berry galettes, Vegan summer berry galettes, Summer berry galette variations, Summer berry galette crust