Introduction
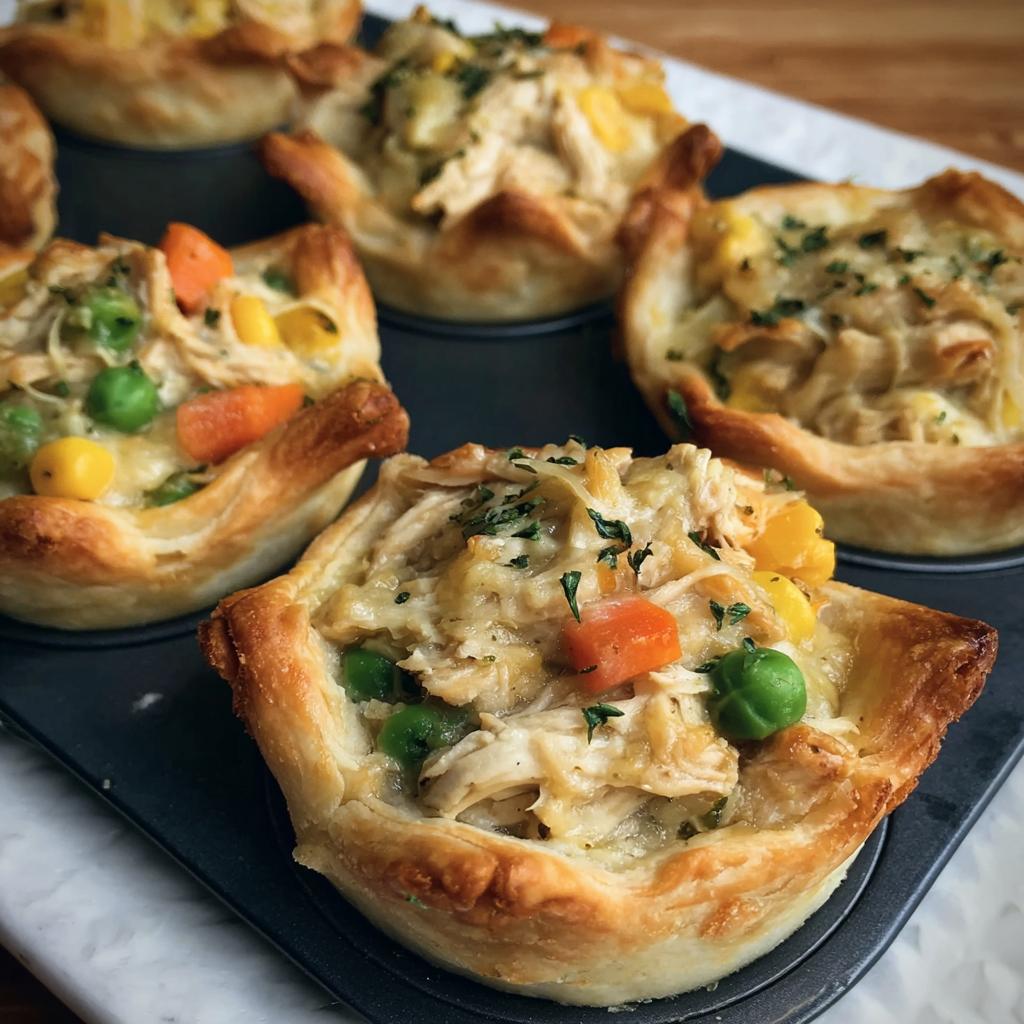
Muffin tin chicken pot pie is the perfect solution for busy weeknights, delivering comfort food in individual portions that are simple to prepare and delightful to eat. These mini pot pies are packed with tender chicken, vibrant vegetables, and a creamy sauce, all encased in a flaky crust that's both satisfying and convenient.
Cooking in a muffin tin allows for a beautifully crispy exterior and a mouthwatering filling without the need for lengthy baking times. Whether you’re serving them as a quick dinner option or as a fun addition to a party spread, these mini pies promise to be a hit.
By using common ingredients, this recipe is not only accessible but also customizable according to your preferences or what’s available in your pantry. Dive into this delicious endeavor and impress your family and friends with these tasty bites!
Ingredients
- 1 rotisserie chicken, shredded
Using a rotisserie chicken saves time while providing well-seasoned, tender meat that forms the heart of the pot pie filling. - 1 cup frozen mixed vegetables
A blend of peas, carrots, and corn adds color, nutrition, and a satisfying texture to the filling, making it hearty without overwhelming preparation. - 1/4 cup onion, diced
Onions enhance the flavor base, providing a subtle sweetness and depth that complements the savory ingredients in the pot pie. - 2 tablespoons butter
Butter is crucial for sautéing the onions, bringing richness to the filling and helping to create a flavor-packed sauce. - 3 tablespoons all-purpose flour
Flour thickens the filling, turning the cooking liquid into a creamy sauce that holds everything together nicely. - 1 cup chicken broth
Broth infuses the filling with moisture and flavor, making the pot pie juicy but not overly soupy. - 1/4 cup milk
Milk adds creaminess to the sauce, enhancing the overall richness of the filling. - 1 teaspoon garlic powder
Garlic powder gives the filling an extra layer of flavor, easily dispersing its taste throughout the mixture. - 1/2 teaspoon salt
Salt is essential for enhancing the overall flavors, balancing the richness and preventing the filling from tasting flat. - 1/4 teaspoon black pepper
Black pepper adds a hint of spice, rounding out the flavors and providing a distinctive kick without being overpowering. - 1 sheet refrigerated pie crust
A pie crust brings the classic pot pie experience, providing a flaky, buttery layer that complements the savory filling. - 1 egg, beaten (for egg wash)
The egg wash gives the crust a beautiful golden-brown color when baked, making the presentation appealing.
Directions & Preparation
Step 1: Preheat the oven to 375°F (190°C).
Preheating the oven is crucial as it ensures that the muffin tin heats evenly from the start. This helps to create a crispy crust while ensuring that the filling is thoroughly cooked from the moment it goes into the oven.
Step 2: Sauté the diced onions in butter over medium heat until translucent.
Cooking the onions in butter allows them to soften and release their natural sweetness, which forms the flavor foundation for the filling. This step is key to developing a deep, rich taste in your chicken pot pie.
Step 3: Add in the flour and stir to create a roux, cooking for about 1-2 minutes.
Creating a roux by cooking the flour with the sautéed onions helps to eliminate the raw flour taste and ensures that the filling thickens properly. This step builds the creamy texture of the filling that defines a good pot pie.
Step 4: Slowly add the chicken broth while stirring, followed by the milk, and cook until thickened.
Gradually adding the broth and milk while stirring helps to prevent lumps in your sauce, ensuring a smooth, creamy filling. Cooking until thickened also enhances the flavors as they meld together beautifully.
Step 5: Stir in the shredded chicken, frozen vegetables, garlic powder, salt, and black pepper.
Incorporating these ingredients during this step is crucial for distributing them evenly throughout the sauce. It's the moment where your savory filling comes to life, making sure each bite of the pie is packed with flavor.
Step 6: Roll out the pie crust and cut into circles to fit into muffin tin cups.
Using a pie crust that fits perfectly in the muffin tin helps create a sturdy shell for the filling. Cutting the crusts makes assembly easier and allows for a balanced ratio of filling to crust, ensuring a satisfying bite.
Step 7: Press the circles of pie crust into the muffin tin and fill with the chicken mixture.
Properly pressing the crust into the muffin tin helps achieve even baking and provides a secure base for the filling. Being careful not to overfill will help prevent spillage while baking, ensuring your mini pies hold their shape.
Step 8: Top each filled crust with another circle of pie crust or create a decorative lattice overlay.
Adding a top layer of crust or lattice allows steam to escape while creating a beautiful presentation. This step is where you can get creative, giving your pot pies a personal touch that will impress your guests.
Step 9: Brush the tops with the beaten egg for a glossy finish.
The egg wash gives the crust a rich, shiny appearance as it bakes, enhancing the visual appeal of your mini pot pies. This simple step elevates your dish, making it look as appealing as it tastes.
Step 10: Bake for 25-30 minutes until golden brown.
Baking until golden brown ensures that the crust is crispy and the filling is heated through. Keep a close eye during the last few minutes to avoid over-browning, which can impact the texture and flavor of the crust.
Step 11: Allow to cool for 5 minutes before removing from the muffin tin.
Cooling in the tin helps the filling to set slightly, making it easier to remove without falling apart. This brief resting period allows for the flavors to further meld, enhancing the overall taste right before serving.
Customize Your Filling
One of the beautiful aspects of muffin tin chicken pot pie is its adaptability. Feel free to swap in your favorite vegetables, like chopped broccoli or spinach, to tailor the filling to your taste. You can even substitute the chicken with turkey or a plant-based protein for a different spin, making this dish endlessly versatile.
Perfect for Meal Preparation
Preparing muffin tin chicken pot pies in advance makes it easier to manage busy weeknights. You can assemble them ahead of time and store them in the refrigerator for a few hours before baking or even freeze them for future meals. This method allows you to enjoy homemade comfort food any night of the week without the stress.
Serving Suggestions and Pairings
These delightful mini pies can be served on their own or paired with a fresh salad for a complete meal. For a more rustic touch, consider adding a side of mashed potatoes or steamed green beans. Their bite-sized nature also makes them a fun finger food at gatherings or family parties, where they can be enjoyed with a variety of dips.
FAQs
What if my filling is too thick or too thin?
If your filling is too thick, add a splash of broth or milk to loosen it slightly. If it's too thin, continue cooking for a few minutes until it thickens or add a bit more flour.
Can I use a different type of pie crust?
Yes, you can use homemade pie crust or even puff pastry as an alternative. Choose a crust that can hold the filling well and achieves your desired texture.
How can I reduce the greasiness of the filling?
To reduce greasiness, opt for a leaner cut of chicken or drain excess liquid after cooking the filling. Balancing the butter used for sautéing can also help.
What spices can I add to enhance the flavor?
Consider adding fresh herbs like thyme or rosemary, or spices like paprika or cayenne for a kick. Experimenting with seasonings can personalize the flavor to your liking.
How can I ensure my crust doesn’t become soggy?
To prevent a soggy bottom, pre-bake the crust slightly before adding the filling, or ensure your filling isn’t overly wet. Letting the filling cool before assembling can also help.
Is there a recommended way to reheat leftovers?
For best results, reheat leftovers in the oven at 350°F (175°C) for about 10-15 minutes until heated through. This will help keep the crust crispy.
Conclusion
Muffin tin chicken pot pie is not just a meal; it's a delightful experience that combines comfort and creativity all in one bite. By mastering this recipe, you’ll have a versatile dish that can be tailored to suit your family's preferences or the ingredients you have on hand.
Whether enjoyed fresh out of the oven or reheated from the fridge, these mini pies are bound to leave a lasting impression. Dive into the world of savory flavors and crispy textures, and enjoy every delicious moment of your culinary creation!
Recipe Card

Savory Muffin Tin Chicken Pot Pie Bites
Ingredients
Method
- Preheat the oven to 375°F (190°C).
- Sauté the diced onions in butter over medium heat until translucent.
- Add in the flour and stir to create a roux, cooking for about 1-2 minutes.
- Slowly add the chicken broth while stirring, followed by the milk, and cook until thickened.
- Stir in the shredded chicken, frozen vegetables, garlic powder, salt, and black pepper.
- Roll out the pie crust and cut into circles to fit into muffin tin cups.
- Press the circles of pie crust into the muffin tin and fill with the chicken mixture.
- Top each filled crust with another circle of pie crust or create a decorative lattice overlay.
- Brush the tops with the beaten egg for a glossy finish.
- Bake for 25-30 minutes until golden brown.
- Allow to cool for 5 minutes before removing from the muffin tin.
Tried this recipe?
Let us know how it was!Notes
Additional serving suggestions: pair with a crisp salad, garlic bread, or roasted seasonal vegetables for balance.
For make-ahead, prep components separately and assemble just before heating to preserve texture.
Taste and adjust with acid (lemon/vinegar) and salt right at the end to wake up flavors.