Introduction
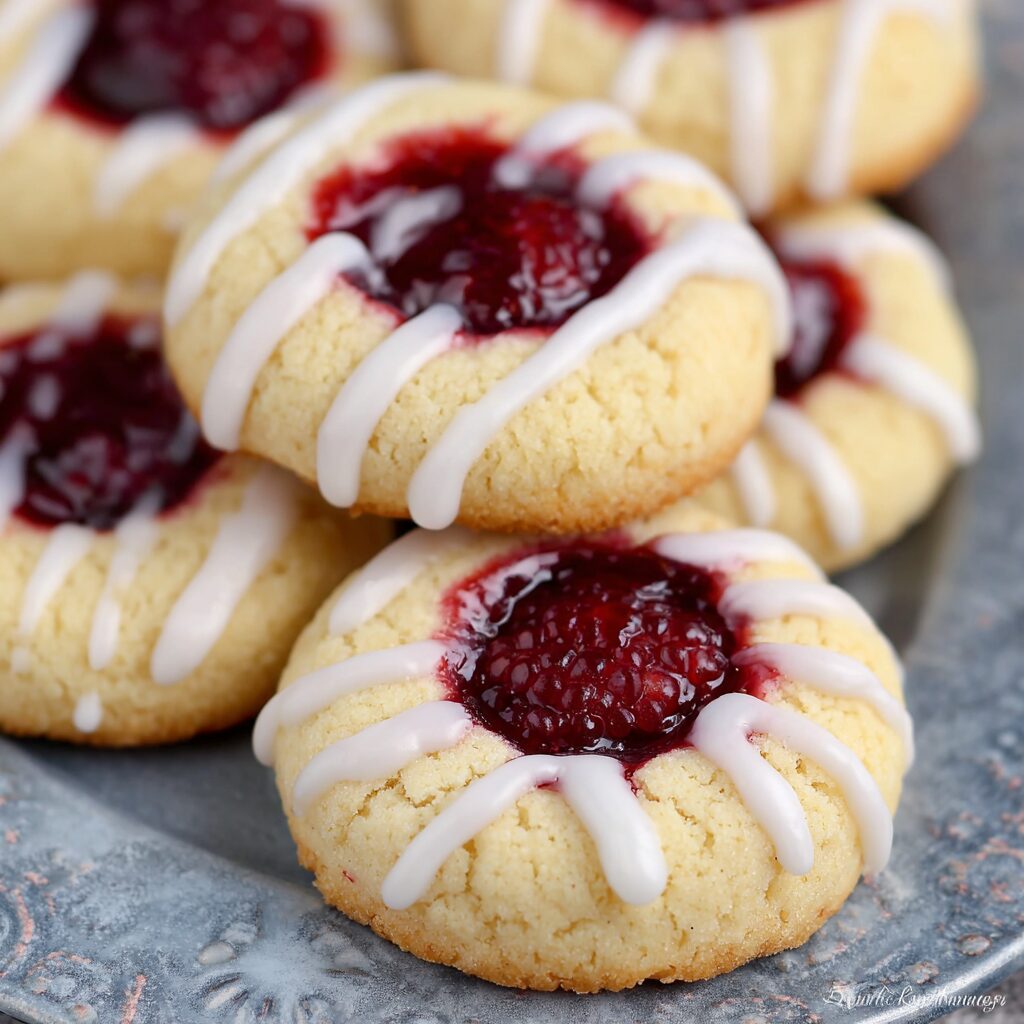
Raspberry thumbprint cookies are a delightful treat that combines the buttery flavor of a classic cookie with the tangy sweetness of raspberry jam. These tender cookies are not just visually appealing; they also offer a burst of fruity flavor in every bite. Perfect for any occasion, they can be made for family gatherings, bake sales, or simply as a sweet indulgence for yourself.
With a simple base of butter, sugar, and flour, the thumbprint cookie can be customized with various jams or fillings. The addition of a sweet icing creates a beautiful finish and enhances the flavor profile. Best of all, they are easy to make, allowing home cooks to spread smiles with every batch.
Ingredients
- 1 cup unsalted butter, softened
Butter is the star of this cookie, providing richness and a tender texture. Softened butter ensures that it creams well with sugar, creating a light and airy dough. - 3/4 cup granulated sugar, divided
Sugar sweetens the cookies and helps create a slightly crisp edge while keeping the center tender. Dividing the sugar allows some to be used for rolling the dough balls, adding a delightful crunch. - 1 teaspoon vanilla extract
Vanilla extract adds warmth and depth to the flavor. It complements both the buttery base and the tartness of the raspberry jam wonderfully, providing a well-rounded taste. - 2 cups all-purpose flour
Flour gives structure to the cookies. The balance of flour to fat is crucial, ensuring that the cookies hold their shape while still being soft and tender. - 1 teaspoon baking powder
Baking powder acts as a leavening agent, helping the cookies rise slightly and become light. It counteracts the density of the butter and sugar. - 1/4 teaspoon salt
Salt enhances all the flavors in the cookie and balances the sweetness. It is a crucial ingredient that brings out the best in the other flavors. - 2/3 cup seedless raspberry jam
The jam is the star filling of these cookies, providing a tart contrast to the sweetness of the cookie. Using seedless jam ensures a smooth finish for the thumbprints. - 1/2 cup confectioners' sugar
Confectioners' sugar is used for the icing, creating a sweet, smooth glaze that adds richness to the cookies. Its fine texture dissolves easily, making it perfect for drizzling. - 1/2 teaspoon vanilla extract (for icing)
Adding vanilla extract to the icing gives it a pleasant flavor that complements the cookies. It rounds out the sweetness and adds an inviting aroma. - Water (as needed for icing)
Water is added to adjust the consistency of the icing. This ensures the icing is pourable but not too runny, achieving the perfect drizzle over the cookies.
Directions & Preparation
Step 1: In a medium bowl, stir together the flour, baking powder, and salt.
This step is crucial as it combines the dry ingredients uniformly. By whisking them together first, you ensure that the baking powder and salt are evenly distributed. This prevents any lumps and guarantees an even rise and flavor throughout the cookies.
Step 2: In a large bowl, cream together the softened butter, 1/2 cup granulated sugar, and vanilla extract until light and fluffy.
Creaming the butter and sugar is essential for achieving a light and airy texture in your cookies. This process incorporates air into the butter, allowing the cookies to rise during baking. Aim for a pale, fluffy mixture, which typically takes about 2-3 minutes with an electric mixer. Don't skip this step, as it significantly affects the final texture.
Step 3: Add the egg and beat well until fully incorporated.
Incorporating the egg adds moisture and richness to the dough. It acts as a binding agent, ensuring that all ingredients are held together while also contributing to the cookie’s tender crumb. Beating until fully incorporated creates an even texture that prepares the dough for the addition of dry ingredients.
Step 4: Gradually beat in the flour mixture until just combined.
Mixing in the dry ingredients gradually helps prevent overworking the dough, which can lead to tough cookies. Mix until you no longer see the flour, but be careful not to overmix. The dough should be soft but not sticky, allowing for easy handling in the next steps.
Step 5: Chill the dough for one hour.
Chilling the dough firms it up, making it easier to handle and shape into balls. This step also helps to enhance the flavors as the ingredients meld together. It slows down the spread of the cookies while baking, leading to a thicker, sturdier cookie that properly holds the thumbprint.
Step 6: Preheat your oven to 350°F and line baking sheets with parchment paper or silicone baking mats.
Preheating the oven ensures that the cookies bake evenly from the start. Lining your baking sheets helps prevent sticking and makes for easy cleanup. If you do not have parchment paper, greasing your pans will also work, but parchment often yields better results.
Step 7: Place the remaining 1/4 cup of granulated sugar in a small dish. Roll dough into 1-inch balls, then roll the balls in sugar before placing them 2 inches apart on the prepared baking sheets.
Rolling the dough in sugar before baking creates a delightful sugary crust on the cookies, enhancing the overall texture and providing a pleasant crunch. Placing the balls apart allows room for them to spread slightly while baking, resulting in beautifully shaped cookies.
Step 8: Make an indentation in the center of each ball using your thumb or the end of a wooden spoon handle.
Creating an indentation is what makes these cookies 'thumbprint' cookies. This step is crucial to hold the jam filling, so take care to make a deep enough dent without breaking the dough. This is where the raspberry jam will sit, adding flavor and visual appeal to your finished cookies.
Step 9: Bake for 13-16 minutes until the edges are slightly browned.
Baking the cookies until the edges are golden ensures they have the ideal texture: slightly crisp on the outside while remaining soft and tender inside. Keep an eye on them toward the end of the baking time to avoid overcooking, as every oven is different. Once they look golden around the edges, they are ready.
Step 10: Remove the cookies from the oven and allow them to cool on the baking sheets for a few minutes before transferring to wire racks.
Cooling the cookies on the baking sheets helps them set before moving them. They are delicate right out of the oven, and letting them firm up slightly on the sheets makes them easier to transfer. After a few minutes, move them to wire racks to cool completely, allowing air to circulate and preventing sogginess.
Step 11: Spoon jam into the center of each cookie.
Adding the raspberry jam after baking not only gives a vibrant look but also allows the jam to maintain its flavor and texture. Melting the jam slightly in the microwave before spooning can help it spread better. The warm cookies will slightly melt the jam, making it adhere beautifully within the thumbprint.
Step 12: To make the glaze, combine confectioners' sugar, vanilla extract, and enough water to reach a drizzle-able consistency.
Making the icing is a final touch that adds sweetness and decoration to the cookies. The icing should be thick yet pourable; start with small amounts of water to avoid making it too thin. Use a spoon or piping bag to drizzle the icing over the cookies for a beautiful finish.
Step 13: Store the cookies in an airtight container in a cool place with parchment paper between layers.
Storing the cookies correctly helps maintain their texture and flavor. The parchment paper prevents sticking and keeps the cookies fresh longer. Keep the container sealed tightly to avoid moisture, which can lead to sogginess.

Exploring Raspberry Variations
While raspberry jam is traditional for these cookies, feel free to experiment with other fruit preserves. Strawberry, apricot, or blueberry can be delightful alternatives. Just be mindful of the sweetness, as some jams may be sweeter than others, affecting the final flavor of your cookies.
Creative Icing Ideas
In addition to a simple vanilla glaze, consider flavoring your icing with lemon juice or almond extract for added complexity. A drizzle of dark chocolate can also make a decadent addition, enhancing the sweet-tart flavor profile of the raspberry and elevating the visual appeal.
Why Texture Matters
The balance of crisp edges and soft centers in thumbprint cookies is what makes them so irresistible. The technique of creaming the butter and sugar plays a pivotal role in achieving this texture. Understanding how each ingredient interacts is key to mastering cookie baking at home.
FAQs
What should I do if my dough is too sticky?
If your dough is too sticky to handle, it could be due to the butter being too soft or too much moisture in the mixture. You can add a small amount of flour, one tablespoon at a time, to help it firm up. Chilling the dough longer can also make it easier to work with.
Can I use a different flavor of jam?
Absolutely! Feel free to substitute with any seedless jam you prefer, such as apricot or peach, to create your customized thumbprint cookies. Just ensure that the jam is of similar consistency to raspberry for best results.
Why are my cookies spreading too much during baking?
Excessive spreading can happen if the dough is too warm or if there's too much butter. Make sure to chill the dough sufficiently before baking, and avoid over-creaming the butter and sugar to reduce air incorporation.
What if my icing is too thick?
If your icing turns out too thick, simply add a few drops of water, mixing well until you reach your desired consistency. Remember, the icing should be thick enough to hold its shape but pourable for drizzling over the cookies.
How can I make the cookies more visually appealing?
To enhance the visual appeal, consider dusting the cooled cookies with a little extra confectioners' sugar or even sprinkles before serving. This adds color and makes for an attractive presentation.
Why do my cookies taste bland?
Bland cookies can result from not using enough salt, which can dull the overall flavor. Ensure you're using the recommended amount of salt to enhance the taste. Additionally, quality vanilla extract can significantly impact flavor.
Can I double the recipe for a larger batch?
Yes, you can easily double the recipe. Just ensure your mixing bowl is large enough to hold all the ingredients and that you monitor the baking time, as a larger batch may require adjusting the baking duration slightly.
What's the best way to present these cookies for a gathering?
For gatherings, consider placing the cookies on a decorative platter or stacking them in a clear container with a ribbon. Adding a few fresh raspberries around the cookies can also enhance the presentation and bring a fresh touch.
Conclusion
Raspberry thumbprint cookies with icing are not just a treat for the taste buds but also a joy to make. Their delightful texture and flavor combination creates an indulgence that’s hard to resist. Whether you're baking for a special occasion or just for fun, these cookies are sure to impress.
By following the steps outlined, you can create a batch of cookies that not only look beautiful but taste amazing. Experiment with different jams and icings to make them your own, and enjoy sharing these delightful cookies with friends and family.
Recipe Card
Delicious Raspberry Thumbprint Cookies with Icing
Ingredients
Method
- In a medium bowl, stir together the flour, baking powder, and salt.
- In a large bowl, cream together the softened butter, 1/2 cup granulated sugar, and vanilla extract until light and fluffy.
- Add the egg and beat well until fully incorporated.
- Gradually beat in the flour mixture until just combined.
- Chill the dough for one hour.
- Preheat your oven to 350°F and line baking sheets with parchment paper or silicone baking mats.
- Place the remaining 1/4 cup of granulated sugar in a small dish. Roll dough into 1-inch balls, then roll the balls in sugar before placing them 2 inches apart on the prepared baking sheets.
- Make an indentation in the center of each ball using your thumb or the end of a wooden spoon handle.
- Bake for 13-16 minutes until the edges are slightly browned.
- Remove the cookies from the oven and allow them to cool on the baking sheets for a few minutes before transferring to wire racks.
- Spoon jam into the center of each cookie.
- To make the glaze, combine confectioners' sugar, vanilla extract, and enough water to reach a drizzle-able consistency.
- Store the cookies in an airtight container in a cool place with parchment paper between layers.